I did a google search for knooking entrelac and I got no hits. So, I decided to try to figure it out for myself.
Essentially, knitting entrelac is just making a series of rectangles, one at a time. One row of rectangles leans to the left and the next row leans to the right. It looks like a diagonal basket weave. It’s quite simple and fun to do.
When making it with two needles, you make your rectangles and slide them over onto one of the needles to wait, while you make the next one. I couldn’t figure out how to do this with the knook, because one is left with live stitches that need to be held until the next row of rectangles is made. And since our second “needle” is already in use, I didn’t know how to get it to work while still being able to work back and forth.
What I decided to do was use little pieces of ribbon to hold the live stitches on the waiting rectangles. This frees up my knooking cord for making the next row of rectangles.
Following this wonderful entrelac tutorial I made this:

Initial triangles:

First rectangle:
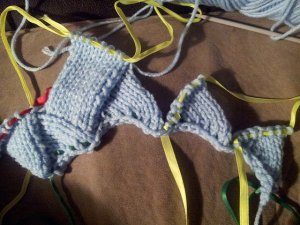
First row of rectangles done:

Working on the second row of rectangles:


I completed three rows of rectangles and then finished off.
This was an 8-stitch entrelac pattern, so it didn’t take very long cords to do. I found that I was cutting my small “holding” strips of ribbon (for the stitches that were waiting) a bit too short. As I was working those stitches, the ribbon would sometimes slip out of the stitches. Thankfully, this was Red Heart Super Saver yarn, so it was fairly grabby and I was able to get a locking stitch marker into them to keep them from laddering down.
When I finished a rectangle, I would take the little piece of ribbon out of the one below (that I just finished picking up the stitches on) and reuse the ribbon. So, it didn’t take very many pieces of ribbon.
Also, because you are working back and forth (almost like short rows) the knook cord doesn’t have to be very long either.
And that’s it!
I know this post is brief, but I just wanted to let you know that, YES! Knooking entrelac really is possible! And hopefully this little bit of instruction will help you be able to do this fun stitch, too!
As always, if you have any questions or need some clarification, please feel free to contact me. I’m happy to help.

I had to google knooking after seeing this and I’m glad I did! I heard about it a couple of years ago but it didn’t really have a name that was well known so was impossible to find anything about it, not I can find hooks and all sorts 😀
I love your entrelac effort too, it’s something I’m dying to do. Is there any way of estimating how big a piece will be or is it trial and error and lots of test squares?
LikeLike
I think you’re really going to have to swatch it out, I’m afraid. If you look at some patterns, you could probably get a good idea of how big something will be. But, of course, it depends on your gauge.
Thank you! Entrelac is deceptively simple to do. I do suggest that you give it a try. 🙂
The knook really is a much better knitting tool for me. I’ve got the crochet muscle memory and the knook works well with that.
LikeLike
I did think it’d be a swatch job but you never know, there is sometimes a trick to things like that, gauge allowing!
Did you buy a special knook or adapt a standard hook?
LikeLike
And it would be really hard to guesstimate, too, because the stitches are going diagonally. I really do think that even a small swatch would save some heartache; particularly if gauge is important.
And really, the size is dependent on the width of your rectangles. In my test swatch, it is a width of 8 stitches. But really, you could make them any width you want. Of course, your CO determines the width of the project. You can make it as tall as you want, from there.
I bought special knooks. However, the gal that I got most of mine from actually made them from crochet hooks. All you need to be able to do is drill a small hole into the end, to fit the cord.
You could look her up on etsy. Her name is earthnut. I know she had stopped making them indefinitely, due to her day job. But, hers were metal and she had sizes all the way down for socks. I bought an entire set.
If you’re on ravelry, check out the knooking group there. 🙂
LikeLike